How to Cut Panelling on a Table? Cutting panelling on a table saw is a fundamental skill for DIYers and woodworking enthusiasts. Panelling, which comes in materials like plywood, MDF, and hardboard, is used for various projects like wall treatments, built-in furniture, and shelving.
A table saw offers a controlled and efficient way to rip (cut along the length) or crosscut (cut across the width) these panels for precise applications.
This guide delves into the detailed process of cutting panelling on a table saw, ensuring clean cuts and safe operation. We’ll cover everything from preparing your workspace and tools to making precise cuts and finishing touches.
Safety First: Gearing Up and Preparing the Workspace
Before we dive into the cutting process, safety is paramount. Here’s what you’ll need to prioritise:
Personal Protective Equipment (PPE):
Safety glasses: Wear protective eyewear to shield your eyes from sawdust and potential debris.
Ear protection: Table saws can be noisy. Use earmuffs or earplugs to safeguard your hearing.
Dust mask: Mitigate dust inhalation by wearing a dust mask appropriate for the type of panelling you’re cutting (e.g., some materials may require a respirator).

Workspace:
Choose a well-ventilated area with ample space to manoeuvre the panelling and maintain a safe distance from the saw.
Ensure good lighting to clearly see your cut lines and the saw blade.
Clear the workspace of any clutter or tripping hazards.
Essential Tools and Materials
Table saw: This is the workhorse for cutting panelling. Ensure the saw is stable, level, and functions properly.
Saw blade: Select a sharp fine-tooth blade (ideally 80-100 teeth) specifically designed for cutting plywood or similar materials. A dull blade can cause chipping, tear-out, and even kickback (sudden movement of the workpiece).
Tape measure: Measure and mark your cutting lines accurately.
Straightedge: A long straightedge (e.g., steel ruler, framing square) helps create precise and straight cut lines.
Pencil: Mark your cutting lines clearly on the panelling.
Push stick: A push stick is a long, narrow piece of wood used to safely guide smaller panelling pieces through the cut without putting your hands near the blade. Clamps can be helpful for securing larger panels to the table saw fence.
Vacuum cleaner: A shop vacuum positioned near the cutting area helps control dust and debris.
Preparing the Panelling for Cutting
- Acclimatisation: If the panelling has been stored in significantly different temperature or humidity conditions than your workspace, allow it to acclimate for 24-48 hours to minimise warping.
- Layout and Marking: Carefully measure and mark your cutting lines on the panelling using the tape measure and straightedge. Double-check your measurements before proceeding.
- Scoring (Optional): For cleaner cuts, especially when dealing with thicker panelling or materials prone to splintering, you can score the cut line using a utility knife. This involves making a shallow cut along the marked line to help the saw blade initiate the cut cleanly.
Setting Up the Table Saw
- Blade Height: Adjust the table saw blade height to slightly exceed the thickness of the panelling you’re cutting.
- Fence: Position the fence parallel to the saw blade at the desired cutting distance. Use a square to ensure the fence is perfectly square to the table.
- Dust Collection: Attach your dust collection system to the table saw’s designated port to manage dust during cutting.
Making the Cut
- Power On: Ensure the table saw is unplugged before making any adjustments. Once everything is set up and double-checked, plug in the saw and power it on. Allow the blade to reach full speed before proceeding.
- Panelling Placement: Carefully place the panelling on the table saw table, ensuring the cut line is aligned with the saw blade and fence.
- Grip and Control: Use a firm grip on the panelling, keeping your hands well away from the blade path. If necessary, use clamps to secure larger panels. For smaller pieces, employ a push stick to safely guide the panel through the cut.
- Cutting Technique: Maintain steady, even pressure as you push the panelling through the saw, following the cut line against the fence. Avoid jerky movements or forceful feeding.
- Offcut Management: As you complete the cut, watch out for the offcut piece and guide it clear of the blade to prevent binding or kickback.
pen_spark
console: Cutting panelling on a table can be done safely and efficiently with the right tools and technique. Here’s a general guide to follow:
Safety First
Wear safety glasses, gloves, and ear protection.
Ensure the table saw is unplugged before making any adjustments.
Preparing for the Cut
- Choose the right blade: A fine-tooth finishing blade (higher TPI – teeth per inch) is ideal for clean cuts with minimal chipping.
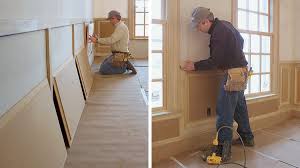
- Prepare the panelling: Lay the panelling flat on a work surface. Mark your cutting lines precisely using a straightedge and pencil.
- Set up the table saw:
Adjust the fence to ensure the cut will be at the desired width.
Raise the blade height slightly above the thickness of the panelling (around half an inch).
Making the Cut
- Support the panel: Large panels can be awkward. Use rollers or outfeed supports to prevent sagging and maintain control during the cut.
- make a shallow preliminary cut along the line with the blade set to barely penetrate the panel’s surface.
- Scoring cut (optional): For smoother cuts, especially on thin plywood, you can Main cut: Adjust the blade to its full cutting height. Power on the saw and let the blade reach full speed. Guide the panelling steadily through the saw while keeping it pressed against the fence.
Finishing Touches
Once the cut is complete, turn off the saw and allow the blade to stop completely before moving the panelling.
For a perfectly smooth finish, you can sand the cut edges with fine-grit sandpaper.
Read Also: How to Install a Dimmer Switch with 2 Wires