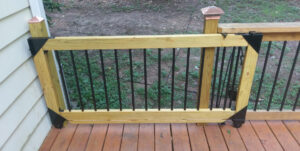
How to build a sliding wooden gate? (EASY) Building a sliding wooden gate can be a rewarding DIY project that enhances the functionality and aesthetic appeal of your property. Here’s a step-by-step guide to help you create a sliding wooden gate with ease.
Materials and Tools
Materials:
- Wooden boards or panels
- Metal tracks and wheels
- Gate frame kit (optional)
- Screws and bolts
- Wood stain or paint
- Concrete mix (if you need to install new posts)
- Latch and handle
Tools:
- Measuring tape
- Level
- Saw (circular or hand saw)
- Drill and drill bits
- Screwdriver
- Hammer
- Post hole digger (if needed)
- Wrench
- Paintbrush
Step-by-Step Instructions
Step 1: Planning and Measuring
- Determine the Gate Size: Measure the width and height of the opening where the gate will be installed. Add a few inches to the width for overlap to ensure the gate covers the entire opening when closed.
- Choose the Wood: Select durable wood, such as cedar or redwood, which can withstand outdoor conditions. Make sure the wood is treated to resist rot and pests.
Step 2: Preparing the Posts
- Check Existing Posts: If you have existing posts, ensure they are sturdy and properly aligned. If not, you may need to install new ones.
- Install New Posts (if needed):
- Dig holes for the posts using a post hole digger. The depth should be around one-third the height of the post.
- Place the posts in the holes and fill with concrete mix. Use a level to make sure the posts are straight.
- Allow the concrete to cure for at least 24 hours.
Step 3: Building the Gate Frame
- Cut the Frame Pieces: Cut the wooden boards to the required lengths for the top, bottom, and sides of the gate frame.
- Assemble the Frame: Lay out the frame pieces on a flat surface and join them using screws or bolts. Ensure the frame is square by measuring diagonally from corner to corner; both measurements should be equal.
- Add Cross Supports: To add stability, attach diagonal cross supports from corner to corner inside the frame.
Step 4: Attaching the Wooden Panels
- Cut the Panels: Measure and cut the wooden panels to fit within the frame.
- Attach the Panels: Secure the panels to the frame using screws, ensuring they are evenly spaced and aligned. If using a solid wood panel, make sure it is securely fastened along all edges.
Step 5: Installing the Sliding Mechanism
- Install the Metal Tracks: Attach the metal tracks to the posts or ground where the gate will slide. Ensure the tracks are level and aligned.
- Attach Wheels to the Gate: Secure the wheels or rollers to the bottom of the gate frame. Make sure they are evenly spaced and properly aligned with the tracks.
- Test the Movement: Place the gate on the tracks and slide it back and forth to ensure smooth operation. Adjust the wheels or tracks if necessary.
Step 6: Adding Finishing Touches
- Stain or Paint the Gate: Apply a wood stain or paint to protect the gate from weather and enhance its appearance. Allow it to dry completely.
- Install the Latch and Handle: Attach a latch to the gate and the post to secure it when closed. Install a handle for easy opening and closing.
Step 7: Final Adjustments
- Check for Stability: Ensure the gate is stable and doesn’t wobble or sway. Tighten any loose screws or bolts.
- Lubricate the Tracks: Apply a lubricant to the metal tracks to ensure smooth and quiet operation.
Tips and Considerations
- Safety First: Always wear safety gear, such as gloves and safety glasses, when using tools.
- Double-Check Measurements: Accurate measurements are crucial for a well-fitting gate.
- Regular Maintenance: Periodically check the gate for any signs of wear and tear, and perform necessary maintenance to keep it functioning smoothly.
By following these steps, you can build a sturdy and attractive sliding wooden gate that will add both security and charm to your property. Enjoy your new gate and the satisfaction of completing a rewarding DIY project.
Read Also.Tar and chip driveway | Advantages and Disadvantages