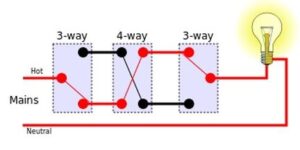
How to wire a 3 way switch with 4 lights?Wiring a 3-way switch with 4 lights is a common and useful electrical project. This setup allows you to control multiple lights from two different locations, such as at the top and bottom of a staircase or on either end of a hallway. Here’s a detailed step-by-step guide on how to accomplish this.
Tools and Materials Needed:
- Tools:
- Screwdrivers (flathead and Phillips)
- Wire strippers
- Pliers
- Voltage tester
- Electrical tape
- Wire nuts
- Drill (optional, for mounting boxes)
-
How to wire a 3 way switch with 4 lights? Materials:
- 3-way switches (2)
- Light fixtures (4)
- Electrical boxes
- 14/2 NM cable (Romex) for connections to lights
- 14/3 NM cable (Romex) for connections between switches
- Wire nuts
- Cable clamps
Understanding the Basics:
- 3-way switches: These switches have three terminals: a common terminal (usually darker or labeled “COM”), and two traveler terminals. The common terminal connects to the hot wire (line or load), and the travelers are used to connect to the other 3-way switch.
- 4 lights: These lights will be connected in parallel, so each light receives the same voltage.
Step-by-Step Wiring Instructions:
Step 1: Turn Off Power
Before starting any electrical work, turn off the power to the circuit you’ll be working on at the breaker panel. Use a voltage tester to ensure the power is off.
Step 2: Install Electrical Boxes
Install the electrical boxes for the switches and lights. Ensure they are securely mounted and properly positioned. The boxes for the switches should be placed at the desired switch locations.
Step 3: Run the Cables
- From the power source to the first switch:
- Run a 14/2 NM cable from the breaker panel (power source) to the first switch box.
- Between the switches:
- Run a 14/3 NM cable between the two switch boxes.
- From the second switch to the first light:
- Run a 14/2 NM cable from the second switch box to the first light fixture.
- Between the lights:
- Run 14/2 NM cables to connect all four light fixtures in parallel.
Step 4: Wiring the First Switch
- Connect the Power Source:
- Connect the black (hot) wire from the 14/2 NM cable (from the breaker panel) to the common terminal (COM) on the first switch.
- Connect the white (neutral) wire from the 14/2 NM cable to a wire nut, adding a white pigtail wire to connect to the neutral wires of the 14/3 NM cable.
- Traveler Wires:
- Connect the red and black wires from the 14/3 NM cable to the traveler terminals on the first switch.
- Connect the ground wire (bare or green) to the ground terminal on the switch and the electrical box.
Step 5: Wiring the Second Switch
- Traveler Wires:
- Connect the red and black wires from the 14/3 NM cable to the traveler terminals on the second switch.
- Common Terminal:
- Connect the black wire from the 14/2 NM cable (going to the first light) to the common terminal on the second switch.
- Neutral Wires:
- Connect the white wire from the 14/3 NM cable to the white wire from the 14/2 NM cable using a wire nut.
- Ground Wire:
- Connect the ground wire from the 14/2 NM cable to the ground terminal on the switch and the electrical box.
Step 6: Wiring the Light Fixtures
- First Light:
- Connect the black wire from the 14/2 NM cable (coming from the second switch) to the black wire on the first light fixture.
- Connect the white wire from the 14/2 NM cable to the white wire on the first light fixture.
- Connect the ground wire to the light fixture’s ground terminal or green wire.
- Subsequent Lights:
- Connect each subsequent light fixture in parallel by connecting the black, white, and ground wires from the previous light to the corresponding wires on the next light.
Step 7: Secure Connections and Mount Fixtures
- Wire Nuts and Electrical Tape:
- Ensure all wire connections are secure using wire nuts. Wrap electrical tape around the wire nuts for added security.
- Mount the Switches:
- Carefully tuck the wires into the electrical boxes and secure the switches to the boxes with screws.
- Mount the Light Fixtures:
- Install the light fixtures according to the manufacturer’s instructions, ensuring they are securely attached and wired correctly.
Step 8: Test the Circuit
- Restore Power:
- Turn the power back on at the breaker panel.
- Test the Switches:
- Test the 3-way switch operation by toggling both switches. Each switch should be able to turn the lights on and off, regardless of the position of the other switch.
- Check for Proper Operation:
- Verify that all four lights operate correctly and that there are no flickering or malfunctioning lights.
Troubleshooting Tips:
- Switch positions: If the lights do not operate correctly, check the positions of the common and traveler terminals on both switches.
- Loose connections: Ensure all wire nuts are tight and that no wires are loose or exposed.
- Neutral wires: Verify that all neutral wires are properly connected, as an open neutral can cause the circuit to malfunction.
- Grounding: Ensure all ground wires are securely connected for safety.
Safety Considerations:
- Electrical Codes: Always follow local electrical codes and regulations when performing electrical work. If you’re unsure, consult a licensed electrician.
- Circuit Overload: Ensure the circuit you’re working on is not overloaded by checking the total wattage of the lights and any other devices on the same circuit.
- Safety Gear: Wear appropriate safety gear, such as gloves and safety glasses, when working with electrical components.
Conclusion:
Wiring a 3-way switch with 4 lights can be a rewarding DIY project, providing convenient control of your lighting from multiple locations. By carefully following the steps outlined above and ensuring all connections are secure, you can achieve a safe and functional installation. Always prioritize safety and consider consulting a professional electrician if you have any doubts or encounter any difficulties.
Read Also.Top 10 outdoor pavilion Advance ideas