Troubleshooting and Fixing a Leaking Shower Handle A leaking shower handle can be an annoying and wasteful problem, but it’s often a fixable issue that doesn’t require professional help. This guide provides a comprehensive overview of diagnosing the cause of a leak and how to fix it yourself. By following these steps, you can save water, prevent potential damage, and maintain your shower’s functionality.
Tools and Materials Needed
Before starting, gather the necessary tools and materials:
- Adjustable wrench or pliers
- Screwdrivers (flathead and Phillips)
- Allen wrench (if needed for your handle type)
- Replacement O-rings or washers
- Replacement cartridge (if needed)
- Plumber’s grease
- Teflon tape
- A small brush or cloth
- Bucket or bowl
- Towels
Step 1: Identify the Type of Shower Valve
Shower valves come in different types, such as single-handle, double-handle, and thermostatic valves. Identifying the type of valve will help you understand its construction and the parts you may need to replace. The three common types are:
- Compression Valve: Uses rubber washers to seal the water flow. They often have separate handles for hot and cold water.
- Ball Valve: Common in single-handle faucets, with a rotating ball that controls water flow and temperature.
- Cartridge Valve: Found in both single and double-handle faucets, using a cartridge to regulate water flow.
Step 2: Turn Off the Water Supply
Before disassembling the shower handle, turn off the water supply to avoid flooding. Locate the shut-off valves, typically found behind an access panel near the shower or in the basement. If there are no individual shut-off valves, turn off the main water supply.
Step 3: Drain the Lines and Protect the Area
Open the shower faucet to drain any remaining water from the lines. Place a bucket or bowl under the faucet to catch any residual water. Use towels to protect the shower floor and catch any drips.
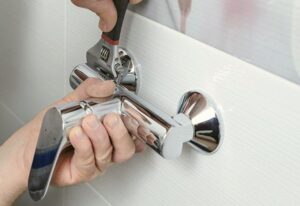
Step 4: Remove the Shower Handle
Depending on the type of handle, you may need an Allen wrench, a screwdriver, or pliers to remove it. Look for a set screw on the side or bottom of the handle and loosen it. Carefully pull the handle off the valve stem. If it’s stuck, gently wiggle it back and forth or use a handle puller tool.
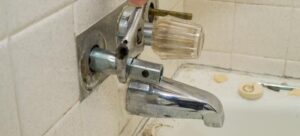
Step 5: Inspect the Valve Components
With the handle removed, you can now inspect the valve components:
- O-Rings and Washers: Check for signs of wear, cracks, or deformation. These are common sources of leaks.
- Cartridge or Ball Assembly: Look for damage, mineral buildup, or worn-out parts.
Step 6: Replace Damaged Parts
For Compression Valves:
- Remove the valve stem using a wrench.
- Replace the rubber washer at the end of the stem.
- Replace the O-rings if they appear worn.
For Ball Valves:
- Remove the cap and collar to access the ball assembly.
- Replace any worn-out O-rings and springs.
- Inspect the ball for damage and replace if necessary.
For Cartridge Valves:
- Remove the retaining clip or nut holding the cartridge in place.
- Pull out the cartridge and inspect it.
- Replace it if it’s damaged or worn.
Step 7: Clean and Lubricate
Before reassembling, clean all parts to remove any debris or mineral buildup. Use a small brush or cloth to clean the valve housing. Apply a small amount of plumber’s grease to the O-rings, washers, and cartridge to ensure smooth operation and a good seal.
Step 8: Reassemble the Shower Handle
Reassemble the shower handle in the reverse order of disassembly:
- Insert the new or cleaned cartridge into the valve housing.
- Secure it with the retaining clip or nut.
- Reattach the handle and tighten the set screw.
- Make sure all parts are properly aligned and secured.
Step 9: Turn On the Water Supply
Once everything is reassembled, turn on the water supply. Slowly open the shower faucet to check for leaks. Let the water run for a few minutes to ensure there are no drips or leaks around the handle and valve.
Step 10: Final Checks and Adjustments
If you notice any leaks, tighten the connections and check the alignment of the components. Apply Teflon tape to the threads of any connections if necessary. Once satisfied, clean up the area and remove any remaining tools and materials.
Preventive Maintenance Tips
To extend the life of your shower valve and handle, consider the following preventive maintenance tips:
- Regularly check for leaks and address them promptly.
- Clean the showerhead and valve components to prevent mineral buildup.
- Lubricate O-rings and washers during routine maintenance.
- Replace worn-out parts as needed to avoid major repairs.
Conclusion
Fixing a leaking shower handle is a manageable DIY task that can save you money and prevent water waste. By following the steps outlined in this guide, you can identify the cause of the leak, replace damaged parts, and reassemble the handle to restore proper function. Regular maintenance and timely repairs will keep your shower working efficiently and prolong the lifespan of its components.
Read Also.How to washing machine water valve on or off?